lunes, 6 de junio de 2016

PREMIO ESPIRAL 2016, ¡Gracias!!

El equipo de infoEdugrafías:


Alberto García (@albertogp123), Lucía Alvarez (@luciaalvarez), Magdalena Pastor (@magpano), Rosa Navas y Nieves G. Morán (@nievescout)

Queremos agradecer a Espiral Edublogs 2016 el haber considerado el blog de InfoEDUgrafías, uno de los tres blog merecedores de la Peonza en la categoría de blogs colaborativos.
La ilusión es mucha y las ganas de compartir el premio con todos quienes habéis formado parte de este Proyecto, desde Infantil hasta Bachillerato, y del Norte al Sur, vuestras aportaciones, la ilusión de los alumnos y el buen trabajo diario en las aulas obtienen ahora este premio. Es vuestro , de cada profe y de cada alumno que ha participado en el Proyecto InfoEdugrafías. Gracias de corazón.


martes, 24 de mayo de 2016

LA EDAD MODERNA desde Chiclayo

El equipo de InfoEDUgrafías da las gracias por este bonita presentación un gran trabajo realizado por el alumnado de Chiclayo en Perú y nuestro mayor reconocimiento para  ALeyda y su alumnado.

Mi nombre es Aleyda Leyva Cévez y escribo desde Chiclayo, una ciudad del norte de Perú. Hoy vi los resultados, ¡muchas felicidades por su peonza!

Hace un tiempo vengo trabajando infografías con mis chicos de secundaria (entre 12 y 15 años) y ha dado magníficos resultados. En esta oportunidad me gustaría compartir las infografIas realizadas en el tercer año de secundaria en donde abordamos el inicio de la Edad Moderna.

Datos claves
País: Perú
Institución Educativa Privada: Peruano Español (Sede Chiclayo)
Docente: Aleyda A. Leyva Chévez

INFOGRAFÍAS DE LA EDAD MODERNA EN POWER POINT
Tercer año entró a la edad moderna y como proyecto de unidad decidimos trabajar infografías ya que así tendrían oportunidad de indagar, organizar y representar información, además que me aseguraría que sus productos sean originales.
 Primero definimos los hechos históricos referentes a los siglos XVI y XVII que se debían investigar para que luego los chicos se encarguen de analizar el hecho identificando, causas y consecuencias y; luego, sea plasmado en una infografía.
 Estudiar dos siglos en corto tiempo es un reto para los alumnos y docentes, en especial cuando refiere a pueblos distantes cuya geografía política es difícil reconocer, por eso con este proyecto se busca fomentar la investigación de hechos específicos.

 ¿Cómo trabajamos?
Ya que requería de una guía sencilla y que explicara el proceso de hacer infografías para el curso de historia, decidí elaborar mi propia guía que quedó organizada en cuatro pasos:

PASO 1:
Búsqueda de la Información: A cada microequipo se le asignó un tema específico sobre el tema de la unidad. En clase se da el alcance sobre las principales características de cada aspecto, pero los alumnos deben investigar datos más profundos.

PASO 2
Selección y organización de la información: Los alumnos deben identificar cuál es el contenido que deben incluir en su infografía, para esto se plantea una serie de preguntas que le guíen en la organización de la información, así verifican que su investigación de fuentes permite el estudio del tema trabajar.
Las preguntas planteadas deben girar en torno al tema indicado y a los siguientes ejes:
  • ¿En qué contexto se dio? (espacio  y tiempo)
  • ¿Qué características presenta?
  • ¿Cuáles son sus elementos, clases o componentes?
  • ¿Cuál es la secuencia de hechos?
  • ¿Qué grupos sociales y personajes intervienen?
La idea es que cada pregunta represente un tema a tratar en la infografía, así al  responder tendrá el contenido de la infografía organizado.

PASO 3
Diseño de la infografía: Para esto los alumnos consultaron este enlace para ver una guía  para reconocer los elementos y diferentes diseños. Visitan ejemplos de infografías para luego identificar los organizadores visuales y las imágenes que permitirán explicar mejor el contenido.
 Para identificar los organizadores visuales recomendados pueden verificar la inserción de SmartArt en Power Point, pues es la plataforma que se empleará para la realización de las infografías.
 Debe identificar los elementos (imágenes, texto, organizadores gráficos) con los que explicará cada parte del contenido a presentar.
 Definen un título sugerente que motive la lectura de su infografía, redactan la introducción del contenido y señalan las fuentes empleadas.
 Los alumnos arman su bosquejo en borrador, y compilan el material (imágenes, textos en Word, etc.) en una carpeta zip.

 PASO 4
Realización de la infografía en Power Point:  Power Point es sencillo de usar y los alumnos ya reconocen su manejo, además soluciona la dificultad de acceso a internet que tenemos en el colegio y en las viviendas de los chicos. 

Estoy adjuntando el resumen en la experiencia y algunas de las infografías realizadas. Gracias por promover la metodología de aprendizaje Maker.


Valoración del Proyecto 
Ha sido una experiencia enriquecedora en donde los estudiantes asumieron el reto de realizar productos originales; además, de respetar los tiempos. También mejoró el número de alumnos que cumplieron con la actividad, esta vez el 100% presentó su infografía y casi todos en el tiempo establecido.

Saludos desde Perú.

Aleyda Leyva Chévez

Agradecemos a  la profesora Aleyda y a todo su alumnado, este gran trabajo  con el hemos aprendido  y disfrutado muchísimo. 

sábado, 21 de mayo de 2016

GRUPO DE TRABAJO BUENAVISTA 1

En el grupo de trabajo de profesores y profesoras del  cole Buenavista 1 de Oviedo, hemos trabajado sobre las Infografías, y hemos tomado como referencia este Proyecto Colaborativo.
Así que, dar las gracias al magnífico equipo que nos ha inspirado, para mí ha sido un honor trabajar con vosotros:
Alberto García
Lucía Alvarez
Magdalena Pastor
Rosa Navas
Mº Jesús


jueves, 28 de abril de 2016

Do you know your neighbourhood?

Another CLIL e-project coming from URJC is coming today. It is called 'Do you know your neighborhood?'

It is a collaborative e-project carried out by a team of Pre-Service Teachers in the Master’s Degree of Bilingual Education at URJC.

The team is composed by:
@Alvaro_Gope, @Marta_Gayarre, @22paau, @maradominguezgo and @nepeusp.

They want to introduce their e-project throughout the infographic they have elaborated using the tool called 'Canva'. The aim of the infographic is that students know how the projects work through visual support and the augmented reality of Aurasma.

From their point of view,  it is important as teachers to bear in mind the benefits that the use of infographics for our students has. It allows them to learn better and it has a lot of positive effects for those whose learning style is visual.

As regards the tool they used, 'Canva', it has a lot of resources in order to create an infographic. However, only few things are free, but the tool allows you to create your own template. In their group, they decided to create their own design and the final result is great!

They strongly recommend to use it!


Scan the QR code and Use the Aurasma app if you want to discover more!

martes, 26 de abril de 2016

Learning about the body & senses with ICT

Today we are sharing an educational infographic aimed at learning about the body and the senses for Primary CLIL education.

This infographic has been designed by a team of students at the URJC working on a CLIL e-project called Body and senses. It is a collaborative e-project carried out in the Master’s Degree of Bilingual Education.


They want to introduce their e-project throughout the infographic they have elaborated using the tool called “Piktochart”. The main aim of it is to provide our third graders with a visual support of the main task they are going to do. 

From these pre-service teachers' point of view, the use of infographics is a great resource to be included in the classroom since it eases the understanding of the instructions and it fosters the learning-teaching process. In this light, both teacher and students can take advantage of this fantastic webtool.


Related with the tool they used, “Piktochart”, they believe that it is a great e-tool which allows us to create engaging infographics in order to present projects and other kinds of visual presentations. It offers many features, backgrounds, icons, pictures and templates to personalise work as the customization is much nicer and it provides a dynamic experience rather than using traditional resources. Moreover, you can upload your own images, video, maps and modify them. 

It is a great free resource, available online so everybody can use it only by signing up - freely, too. For these reasons, they highly recommend Piktochart due to its simplicity and usefulness. 

Have a look at their infographic on the following link:

The whole team hope you like it! 

Here you can meet these pre-service teachers and learn more about their team on:

Raquel Diez Alonso → Twitter: @raqueldial & e-Portfolio: learningbydoingwithict.blogspost.com.es
Celia Lancharro Román → Twitter: @celialancharro & e-Portfolio: http://ictandbilingualeducation.blogspot.com.es/
Patricia Madrueño Sierro → Twitter: @patimasie & e-Porfolio: patimasie.tumblr.com
Natalia Martínez Domínguez → Twitter: @NataliaMD93 & e-Portfolio: http://motivationintheclassroom.blogspot.com.es/


jueves, 21 de abril de 2016

The Earth's Adventures

We are sharing a new outcome by a team from the Master's degree in Bilingual Education at Primary Education Schools at the Rey Juan Carlos University. In their subject related to use of ICT in the CLIL classroom, they were asked to participate in this InfoEduGraphic project by their teacher, and here are the results: For this task they had to work in groups to create an InfoEdufoGraphic. The members of this group are: @lainez_ortega@cristinarisueno@GMEstrellaa and @gonzaalo10. To do this they surfed the InfoEduGraphic Project Site to look for tips, instructions and ideas. 

Since all their e-projects (Planets in the Solar SystemThe HydrosphereEnvironmental careThe Mysteries of Earth) are connected with Social Science (planets, Earth, landscapes and so forth), they decided to make an infographic as an introductory tool for a common topic. Their main learning outcome is for their students to know about the planets of the Solar System, The Earth`s layers (Hydrosphere and atmosphere) and landforms as well as environmental care.


First they assigned the roles:


@GMEstrellaa was the coordinator. She had to direct and check that each member did his part of the job. She also encouraged us to keep working on the infographic.

@gonzaalo10 was the supervisor and he was in charge of controlling the creation process and remembering each person's task. He also had to take notes of everybody's ideas. 

@lainez_ortega and @cristinarisueno were the secretaries. They made and create the InfoEduGraphic using Piktochart and Thinglink.

- Finally, (@celiagon92was the speaker. This is why she is the one spreading their work at Twitter and through this blog, as well as her classmates'.

To accomplish this task, they had to face two problems:

  1. How to link all their e-projects contents: After thinking about it for a while, they decided to structure the infoedugraphic from the most asbtract content (the space) to the most concrete one (landforms). This way, we could include all our Social Science contents in a structured and well-organised way. In order to motivate their students, they added a badge that they could get once they finished the learning process.
  2. How to adapt the contents to the different school levels: this challenge was harder to face but finally they thought of making an interactive InfoEduGraphic. What does this mean? They did not only design an infographic (which is an image) but also an interactive image. By doing this, they foster an active learning and allow students of different grades to access to different activities of different difficulty. The teacher could guide all this learning process to do the activities corresponding to each course.


They decided to use the tool Piktochart due to the fact that some members of their group had already used it and they said that it could fit the purpose of the project perfectly. It gives you the possibility to create infographics, posters, presentations or reports depending on what you need. The one they chose is an infographic as it is divided into different blocks which were suitable for each difficulty level. The quality of the pictures and icons that the tool offers is quite high and very attractive, exactly what they were looking for: to captivate students’ attention. Finally, they would like to highlight that Picktochart would be perfect if it offered the possibility of making those graphics interactive (pictures with movements, sounds, links to other webpages and so on) instead of being just an image.
Once they had their infographic finished they went on to make it interactive to promote active learning and to increase pupils' motivation. They did this part of the project using the online tool 
Thing Link. With this tool you can make an interactive image by putting links in small spots inside your picture. Therefore, they included a video to expand knowledge, interactive activities to review each content and an Arts and Crafts activity about environmental care.
As you can imagine, this tool is inreadibly useful to create your own CLIL materials because, by linking resources, you can work the 4Cs. However, they think this tool would be nicer if it offered a wider variety of forms to insert the links, not only spots. 
From this task, they can conclude that Infographics have a lot of uses in our classrooms. They can be used to introduce content, to review vocabulary, to explain the steps of a process or activity, to help children with special educational needs. Infographics present information in a neat and visual way that can clarify students' doubts. Moreover, students can also create their own infographics to learn about content and ICT skills. Their final artifact is this amazing interactive InfoEduGraphic to introduce and learn about different contents regarding our planet. Click on the spots to see the activities: https://www.thinglink.com/scene/773107172895621120

martes, 19 de abril de 2016

Let's learn about Animals

Today we are sharing an augmented educational infographic shared by a team of pre-service Primary Teachers from URJC:


María Collado: @maria_collado92 http://learnwithclil.blogspot.com.es/

Laura Pérez: @LauritaPerz  https://exampleforthem.wordpress.com/

Guillermo Lagarejos:  @GLHmaster  http://guillermolagarejosportfolio.blogspot.com.es/

Teresa Martín:  @Teresa_md  http://tinytreasuresbox.blogspot.com.es/

Marina Goizueta: @GoizuetaMarina  http://mycrazyjourneywithicts.blogspot.com.es/

Sara Rodríguez: @SaritaSar0   kcandlearnenglish.blogspot.com.es


This augmented infographic has been designed with Piktochart first and then augmented with Aurasma. In order to reveal the hidden augmented educational value, these teachers have placed detailed instructions for students to be able to accomplish the challenge. Do not hesitate to follow their public channel at Aurasma and discover it yourself too.

This team, working on a CLIL e-project for Primary Education at the moment, claim that

'Working with infographics is a very illustrative way to show our students whatever we want as teachers of primary education. Any content of any subject could be taught through a project with Infographics.
For us, while we were doing this challenge, we realised that working on "Infographics" is a very helpful way to summarize in a visual way any content.'


jueves, 14 de abril de 2016

How to create your own timeline

Today we are sharing an infographic by a group of students at the Rey Juan Carlos University in Madrid. They want to collaborate in our project as part of their ICT subject within the Master's Degree on CLIL and Primary Education they are currently doing. 

They are working on a collaborative CLIL e-project about History, so they want to share with us the infographic they have created for students to design their own online timeline. 

For this purpose they have decided to use Piktochart, which they think is a great tool to create infographics easily. They claim this online web tool allows people to use images, icons, backgrounds, different text formats and templates and whatever they like to add. The result is amazing and the best thing: everything is free! 

Here you are their digital outcome:


This infographic is aimed at a CLIL history lesson in which students will be able to design an online timeline on their own. Since they will be doing something autonomously they will learn the content while they enjoy working with ICT.

If you want to contact, visit their portfolios or/and follow them on Twitter:

Ana Fuerte: @AnaFuerteCano
Laura González: @LauraGonGar5
Salvador López: @Salvador1987lop
Gabriela Marquez: @GabrielaMqz
Rubén Peinado: @rpeinadog
Nieves Yan: @nievesyan317

martes, 12 de abril de 2016

Olympic Games in Europe

Travelling around Europe is the name of the CLIL collaborative e-project a team of Master's Degree Pre-Service teachers are developing these days at URJC.

Meet them through their Twitter handles or visit their portfolios:

María Dolores Berral Raya @lolaberralraya 'Experiencing being a bilingual teacher'.

María Inmaculada Caballero Torres @teacher_inma 'CLIL with teacher Inma'.  

Ana Martín Vincent @ana_mv9 'Learning with Ana'

Natalia Menchón Rodriguez @Nataliamenchon 'ICT + CLIL Useful Learning'

Elena Ortiz Martin  @elena_ormar 'Learning About ICT in Bilingual Teaching'

Victor Rodriguez Sanchez @VictorodRS 'Education is the beginning'

As part of this e-project they want to introduce the infographic they have elaborated with a key aim: providing their students with guidance to tackle one of the tasks within the full e-project.


They consider an infographic as a visual representation of data. In the one they are presenting, you can see follow up directions about the task they expect their Third Grade students to tackle.  They believe that this is a good resource for both teachers and students.


In their opinion Piktochart, the e-tool they have chosen, is the perfect tool to create attractive infographics, and presentations or reports for their lessons. Among its features they highlight the templates, backgrounds, graphics and different types of fonts. When one finishes one's design, one can also download it in different formats or share it.  They claim they cannot think of any disadvantage since they consider that it worked fantastic and allowed them to develop their digital outcome without any problem.

As they have mentioned before, teachers can use infographics for many purposes in lessons. For instance, to support learners with special needs, as an infographic allows the teacher to present information in a more visual way; or to clarify those concepts that are usually more difficult to understand. Furthermore, due to its ease of use, students can  use it too.  For example they could use it to summarize their learning. In this way, apart from revising one subject content they would also have the possibility to practise their ICT skills!

View the full educational infographic by these future Primary CLIL teachers clicking in the link above or simply here.

viernes, 8 de abril de 2016

Química industrial en el IES Isaac Newton de Madrid

Beatriz Jiménez profesora de Física y Química en el IES Isaac Newton (Madrid), nos ha mandado un excelente trabajo y  nos ha comentado que;

 Hace unos meses nos apuntamos al proyecto para que los alumnos de 1º Bachillerato crearan infografías. Tratan del tema de química industrial: producción de ácido sulfúrico, ácido nítrico, hierro y amoniaco. Es un tema bastante árido, por lo que dividí a la clase en grupos para que cada uno se encargara del esquema de la obtención de uno de estos productos químicos.
La experiencia ha sido bastante positiva. Con la información de vuestra web los alumnos han sido totalmente autónomos a la hora de realizar las infografías. Han usado diversas herramientas y han captado la idea general de lo que es una infografía. En lino.it han recopilado las 11 infografías.


Cada grupo realizó una infografía,

ÁCIDO NÍTRICO

GRUPO 8  ha realizado la infografía con Glosgster 


ÁCIDO NÍTRICO

GRUPO 10  han utilizado easel.ly

ÁCIDO SULFÚRICO

GRUPO 3 han utilizado easel.ly 


ÁCIDO SULFÚRICO

GRUPO 7 han utilizado easel.ly


ÁCIDO SULFÚRICO

GRUPO 2


HIERRO


GRUPO 5


HIERRO


GRUPO 11 han utilizado easel.ly


HIERRO


GRUPO 1


AMONIACO
GRUPO 4  realizada con Piktochart


AMONIACO

GRUPO 6

AMONIACO

GRUPO 9   realizada con Piktochart


Ha sido un gran trabajo  el que nos han dejado  el alumnado de 1º de Bachillertao, nuestra felicitación para todos y para su profesora Beatriz Jiménez@bjmahillo del IES Isaac Newton (Madrid), 

Beatriz Jiménez  @bjmahillo

viernes, 4 de marzo de 2016

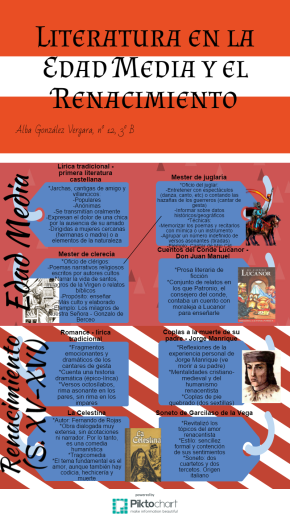
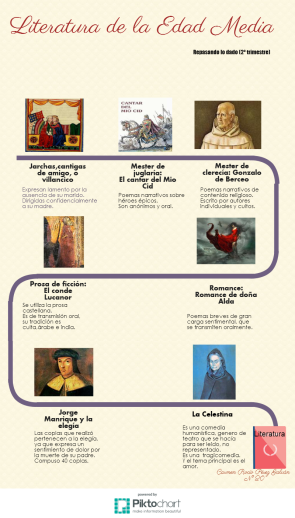
Literatura Medieval en el Colegio BVM Irlandesas Loreto

Fco. Javier Rodríguez Torres  y sus alumnos de 3º de la Eso nos han enviado un trabajo excelente  para que podamos deleitarnos con ellos

Las infografías realizadas se enmarcan dentro de un trabajo realizado en 3º de ESO del Colegio BVM Irlandesas Loreto de  Sevilla, sobre Literatura Medieval. Los alumnos realizaron una serie de trabajos de diversa índole sobre obras de esta época, algunas de las cuales se pueden ver en mi blog personal: loretoareadelengua.wordpress.com
Estos trabajos les permitieron acercarse a estas obras de una manera diferente, con trabajos que combinaban cierto nivel de juego y creatividad, combinado con el uso de herramientas digitales convenientes para realizar estos trabajos. Por ejemplo: Cantares de Gesta "Modernos"; reportajes sobre personajes de la obra La Celestina; La Copla Antagonista, a partir de las Coplas de Jorge Manrique; Cuentos al estilo de los del Conde Lucanor, algunos realizados en vídeos animados. Al final del proceso, los alumnos debieron reflejar lo aprendido en un mapa conceptual, siendo el uso de la infografía una opción. 
Más información: 


Visita la entrada para saber más


  literatura-edad-media-carmen-rocio (1) 


Más infografías sobre literatura medieval


Qué buenos trabajos!! Míralos todos en este enlace:


Blogs de alumnos. Blog de Jesús A., de 3º de ESO Gracias Jesús, me gusta tu blog; El espejo de Oesed Gracias Antonio y César, magnífico blog; El magnífico ...


https://loretoareadelengua.wordpress.com/plan-de-trabajo-de-3o-curso-20152016/4313-2/

Un gran  trabajo Francisco Javier,  muy completo y felicitación a esos magníficos alumnos.

jueves, 3 de marzo de 2016

INFOGRAFÍAS DE LITERATURA UNIVERSAL

Isabel Castro, desde el Instituto La MAR DE FRAU, nos envía las Infografías que realizan sus alumnos y alumnas de 1º de Bachillerato.

Es un trabajo que hago con los alumnos de Literatura universal, de primero de bachillerato. Trabajamos diversas lecturas, entre ellas EDIPO REY y EL MISÁNTROPO.
Utilizamos mucho las nuevas tecnologías de la información y el cine, como forma de profundizar en las obras. 
Una de las actividades finales es siempre elaborar una infografía, que les ayuda a relacionar y sintetizar lo aprendido. 

Os recomendamos la visita completa a la wix que ha creado donde, utilizando nuevas tecnologías acerca a sus alumnos a las obras y los autores.


Excelente trabajo Isabel, muy, muy completo y seguro que provechoso para los chicos y chicas.

Os dejamos unas muestras de las InfoEDUgrafías. La información completa en su 
página WEB.


jueves, 25 de febrero de 2016

Tipos de licencias Creative Commons y sus posibles aplicaciones, en el IES Isabel Perillán y Quirós

Antonio Garrido de la Guía (@antonio_garrido) nos presenta un buen número de estupendas infografías elaboradas por su alumnado de la asignatura "Tecnologías de la Información y Comunicación" de 1º Bachillerato del IES Isabel Perillán y Quirós de Campo de Criptana (Ciudad Real). Las infografías recogen los Tipos de Licencias Creative Commons y sus posibles aplicaciones.
Sin duda un material muy interesante y útil para toda la Comunidad educativa y las diferentes áreas o materias. 
Los autores y autoras de las infografías son:
Carmen Olmedo
Cristina Manjavacas
Alberto Ocaña
Carmen Lasheras
Simion Cotoc
Ernesto Ovejero
Lucía Muñoz-Quirós
Alfredo Díaz-Plaza
Sergio Cruz
Mª José Villaoslada
Sara Porrero
Lucía Barrilero
Stefanía Nes
Azahara Andújar
Pablo Lucas

Podéis consultar también las infografías en Google Drive y conocer el resto de sus trabajos y la actividad de su centro en el blog de aula Peritic

El equipo de InfoEDUgrafías agradece a Antonio y a sus alumnos la participación en el Proyecto. ¡Esperamos seguir recibiendomás trabajos vuestros!!

viernes, 19 de febrero de 2016

Concepto de turismo y sus tipos desde el IES Las Lagunas

 Datos de la docente : Mª Adela Camacho Manarel
 Centro: IES Las Lagunas, Mijas Costa (Málaga)
 Nivel del alumnado: 2º de bachillerato (Optativa: Rutas turísticas por España y Andalucía)

El equipo de InfoEdugrafías se siente muy orgulloso de seguir recibiendo colaboraciones tan valiosas como la de  la profesora María Adela Camacho que junto a su alumnado de 2º de de Bachillerato del IES Las Lagunas, nos presentan el resultado de la actividad  que se ha realizado en el proyecto del primer trimestre bajo el título Concepto de turismo y sus tipos 

El alumnado realizó una investigación sobre 19 modalidades de turismo que plasmó. Ese  trabajo pasó por cuatro momentos de concreción: ficha técnica, presentación, Infografía y Visual thinking  


Estos son los estudiantes con sus trabajos

(Leo:Turismo LGTB/ Chaimae: Turismo de turismo/ Brenda: Enoturismo/ Oliver: Turismo espacial/ Iván: Turismo gastronómico/ Carlos: Turismo de descanso (sol y playa)/ Fátima: Turismo negro/ Marina: Turismo de sol y playa/ Pablo: Turismo de parques de atracciones/ Carmen: Turismo cinematográfico/ Raúl Marín: Turismo cultural/ Raúl Moya: turismo de deportes/ Anitsa: Overland/ Victoria: Turismo etnográfico/ Nerea Ortiz: Turismo literario/ Natalia: Turismo naturaleza/ Dapne: Turismo musical/ Nerea Rainford: Turismo de aventura/ Antonio: Turismo religioso)
En el siguiente tablero podemos ver las 19 infografías que han realizado de los diferentes Tipos de Turismo , hay que pinchar en cada una de ellas para visualizarlas en formato presentación.


También se puede acceder a nuestro tablero en Pinterest sobre Bachillerato donde se pueden ver todas  las infografías
Los Resultado podremos verlos en el site En Rutas 2015
Finalmente agradecer a este gran equipo  formado por la profesora Mª Adela Camacho y a su grupo de alumnos  de 2º de Bachillerato por el  trabajo realizado